How to put on a binder?
Why is a binder so tight?
A binder fits tightly around the chest to create a flatter appearance. Its purpose is to compress the breast tissue, making the chest less visible under clothing. This can help reduce feelings of gender dysphoria, which is common among transgender men, non-binary individuals, and others who feel uncomfortable with their chest.
While wearing a binder can sometimes be uncomfortable and may carry health risks such as breathing difficulties, back pain, and skin irritation, many people still choose to wear one because it helps them feel more comfortable and confident in their bodies.
Binders can serve as an important temporary solution for those preparing for — or who don’t have access to — gender-affirming surgeries like top surgery (chest removal).
Now that we’ve explained why people wear binders and why they fit so tightly, there’s one question left: “How do you put on a binder?”
How do you put on a binder?
There are several ways to put on a binder. Some people find it challenging, as binders are tight and not always easy to get on. That’s why we’ll explain two methods so you can choose the one that works best for you.
You may come across other methods online — for example, putting on the binder by stepping into it and pulling it up over the hips. We do not recommend this!
Doing so increases the risk of damaging the seams, which can compromise the binder’s function.
Wearing the correct size is very important to ensure both safety and effectiveness.
Method 1: Inside Out
- Choose the right size: Ensure your binder fits well. A well-fitting binder provides the best support without being too tight. Unsure about the size? Contact us.
- Hold the binder correctly: Hold the binder by the bottom and turn it inside out.
- Pull it over your head: Put your arms through the armholes and pull the binder over your head. Carefully pull it down until it fits snugly around your chest.
- Adjust the binder: Make sure the binder is evenly distributed and not twisted. It should fit comfortably and snugly without causing breathing issues.
- Check the fit: Ensure you can move and breathe freely. The binder should be tight but not uncomfortable or painful.


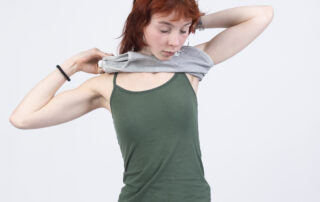
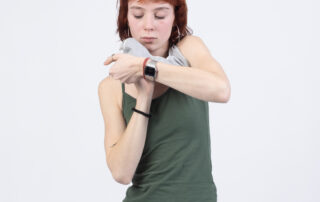

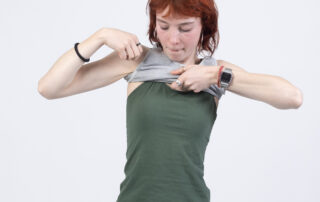


Method 2: One Arm First. See the images above.
- Choose the right size: Ensure your binder fits well. A properly fitting binder provides the best support without being too tight. Unsure about the size? Contact us.
- Hold the binder correctly: Hold the binder as you would wear it and first put one arm through an armhole.
- Pull it over your head: Then put your head through, followed by your other arm, and pull the binder over your head. Carefully pull it down until it fits snugly around your chest.
- Adjust the binder: Ensure the binder is evenly distributed and not twisted. It should fit comfortably and snugly without causing breathing issues.
- Check the fit: Make sure you can move and breathe freely. The binder should be tight but not uncomfortable or painful.
It’s important to take regular breaks from wearing your binder and never wear it longer than recommended.
Do you know another way to put on a binder that works well for you? Let us know!
Sources:
June 2024